


Install bootloader on the ATTiny85
Placed onNow comes a very important step that you must perform carefully. As soon as a cable is connected incorrectly, or the IC is inserted the wrong way around, the ATTiny85 DIP can burn out!
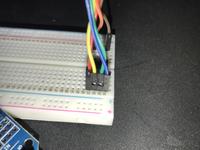
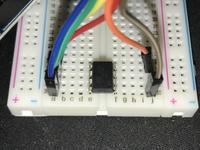
Below are some pictures, make sure your circuit matches this one;
Below are some pictures, make sure your circuit matches this one;
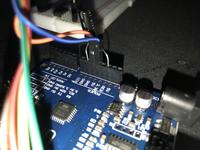

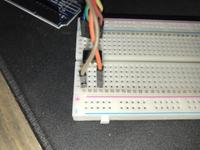
The color of cables you use does not matter, so make sure you have the following connections:
UNO means the Arduino UNO board
BD means Breadboard
Brown: Pin 10 on UNO è Pin 30-J on BD
Red: Pin 11 on UNO èPin 27-A to BD
Yellow: Pin 12 on UNO è Pin 28-A to BD
Green: Pin 13 on UNO è Pin 29-A to BD
Orange: Pin GND to UNO è Pin 27-J on BD
Blue: Pin 5V on UNO è Pin 30-A to BD
Make sure the circle of the ATTiny85 is on pin 30-F.
Place the long side of the capacitor into Pin RES on the UNO and the short side into Pin GND on the UNO.