Soldering Like a Pro: Tips for Perfect Electronic Connections
Placed onSoldering is an exciting step into the world of electronics, a skill that is both practical and immensely rewarding. It's a bit like putting together a model kit, where each correctly placed solder joint contributes to the creation of your electronic masterpiece. With a little practice and patience, you can transform that tangle of wires and components into a smooth, shiny circuit that's ready to perform. So put on your safety goggles, let's solder – the connections are waiting!
The Right Soldering Tool: Soldering Iron, Soldering Gun or Soldering Station?
When starting soldering, choosing the right tool is very important. A standard soldering iron is light, handy and perfect for simple tasks with fewer temperature control requirements. For projects that require precise temperature settings, a soldering station offers a solution. This is a more advanced tool with features such as temperature control and holders for safety and ease of use. For jobs that require more heat and less precision, the soldering gun is the right choice. This tool heats up quickly and is ideal for working with thick wires or large components. Choose a soldering iron for simple tasks, a soldering gun for power and speed, and a soldering station for precision work.
| Tools | Advantages | Cons | Best Use |
|---|---|---|---|
| Soldering iron | Portable, quick to heat up, low cost, easy to use. | Limited temperature control, may cool down during long-term use, less durable. | Small repairs, simple DIY projects. |
| Soldering gun | Strong heat generation, fast heating and cooling, suitable for heavier materials. | Less precise temperature control, heavier, may be less suitable for delicate electronics. | Larger, thicker materials and quick jobs where precision is less important. |
| Soldering station | Precise temperature control, stable heat, often equipped with a stand and sponge for cleaning. | More expensive to purchase, less portable, requires more space. | Professional use, complex electronics, long soldering sessions. |
- Velleman High-quality soldering iron 30W / 230V - VTSI30 € 9,95
- Velleman Adjustable soldering station - 48 w - 160-480 °c € 21,40
- Velleman Soldering station with ceramic heater - 48W - 150-420°C € 62,30
- Xytronic VTSSC78 Soldering station - 80W / 230V - temperature control & ceramic heating element € 115,-
- Velleman Temperature controlled soldering station € 83,85
- Velleman Ceramic soldering gun "quick hot" 30-130 w / 220-240 vac € 10,45
- Velleman High-q soldering iron 60w / 230v € 11,30
- Opencircuit USB Soldering iron 8W € 9,65
The mystery of solder unraveled
Solder, the key to a good solder joint, comes in different compositions. Classic soldering tin consists of an alloy of tin and lead, but nowadays lead-free soldering tin is often used, with additions of copper or silver, for example, for health and environmental reasons. The choice of solder influences the melting temperature and the strength of the connection. For electronics, lead-free solder with a slightly higher melting point than lead-based solder is the standard.
| Type Solder | Advantages | Cons | Application |
|---|---|---|---|
| Leaded (Sn-Pb) | Easy to melt, good wetting, smooth solder joints. | Toxic, not environmentally friendly, may pose health risks. | Older electronics, small hobby projects. |
| Lead-free (Sn-Cu) | Environmentally friendly, no health risks from lead. | Higher melting point, can crumble, more difficult to process. | Consumer electronics, general use within the EU. |
| Tin-silver (Sn-Ag) | Strong connections, lower melting temperature than pure lead-free, good thermal properties. | More expensive than other options, can cause more wear on solder points. | Precision electronics, applications requiring high reliability. |
Some types of solder are formulated with flux, which simplifies and improves soldering. Flux helps clean the metal surfaces during soldering, improves tin fluidity and creates a stronger bond. The advantages of soldering tin with flux are clear: easier work and more durable results. That is why we have chosen to only include soldering tin with flux in our range, so that our customers can always count on high-quality soldering jobs.
- In stock Opencircuit Soldering tin - 0.8mm - rasin core - 8g € 1,55
- In stock Velleman Soldering Tin with Dispenser - 1mm - Resin Core - 17g € 3,65
- In stock Velleman Lead-Free Soldering Tin with Dispenser - 1mm - Resin Core - 15g € 4,35
- Opencircuit Soldering tin - 0.3mm - rasin core - 10g € 3,75
- Velleman soldering tin - 0.6mm - rasin core - 100g € 10,25
- Velleman Lead-free soldering tin - 1mm - rasin core - 100g € 14,60
- Velleman Lead-free solder - 1mm - resin core - 250g € 37,-
- Velleman Soldering tin - 1mm - rasin core - 100g € 10,10
- Opencircuit Soldering tin - 0.5mm - rasin core - 100g € 4,90
Extra tools that make the difference
Soldering goes beyond just having a good soldering iron or soldering station. There are several tools that not only ease the process but can also increase the quality of your work. By investing in these additional tools, you can take your soldering projects to the next level and ensure durable, reliable electronic connections.
Third hand
A 'third hand' is super useful when you start soldering. This tool has clamps that hold your work, so you have your hands free for soldering. This is especially useful when working with small parts that should not move while you are working. An extra helping hand helps you do your work better and easier.
Extra soldering points
A set of (spare) soldering points is also indispensable: different shapes and sizes are needed for various applications, from fine electronic components to firmly connecting cables. To make it easier for you, we show corresponding soldering points for each soldering iron or soldering station directly on the product page. This way you can easily find the right points that match your projects and soldering tools.
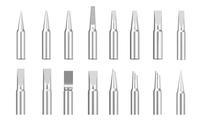 Different types of soldering points
 Svintage accessories
A set of soldering accessories can simplify many soldering tasks and improve the quality of the work. The tools offer more flexibility for various activities, such as adjusting, cleaning and repairing printed circuit boards. These accessories improve soldering precision through better accessibility and handling of the components, resulting in neater and stronger solder joints.
Soldering mats
Silicone soldering mats are ideal for soldering because they are heat resistant and protect surfaces. Their anti-static properties prevent damage to sensitive electronics due to static discharge. They are also flexible and durable, meaning they are easy to store and clean. The silicone provides grip so that components do not shift.
Step by Step Soldering
Soldering is a precision job where every detail counts. From preparing the materials to inspecting the final connection, it is important that each step is completed carefully. The following paragraphs describe the steps in detail, so that you know what is expected of you at each stage and how best to proceed to ensure a strong and durable solder joint. Pay attention, take your time, and don't rush – a perfect soldering job is the result of patience and precision.
1. Surface Preparation
A strong solder joint starts with preparation. It is important that the surfaces you are going to solder on are clean. Use a special soldering fluid (flux) or very fine sandpaper to remove oxidation and dirt. A clean surface ensures that the solder can adhere properly and makes the connection stronger and more reliable. This step cannot be skipped because even a little bit of dirt can affect the quality of the solder joint.
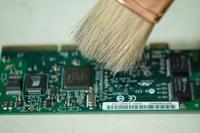 Cleaning a printed circuit board
 2. Heating the soldering tip
Once your surfaces are clean, heat the soldering tip of your soldering iron or soldering station. It is important to set the correct temperature - not too hot, which can damage the components, but hot enough to melt the solder properly. A good guideline for most solder is a temperature between 300 and 350 degrees Celsius. Wait a moment until the soldering iron has reached the set temperature stably before continuing.
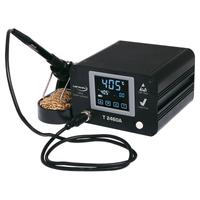 A display is almost indispensable when soldering
 3. Applying solder
With the soldering tip heated, it's time to apply a small amount of solder. Hold the soldering tip against both the component and the circuit board to ensure proper heat transfer. Then touch the connection with the soldering tin, not the soldering tip itself. The solder should melt immediately and flow evenly over the joint. This process must be done quickly to avoid overheating.
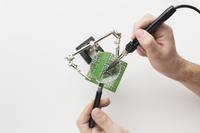 Hold the soldering iron against the connection
 4. Forming the Connection
Once the solder is flowing, slowly pull the soldering iron away while the solder is still melted. This must be done with a steady hand to avoid breaking the solder that has not yet solidified. The solder should solidify in a few seconds and form a shiny surface around the joint, which is an indication of a good solder joint.
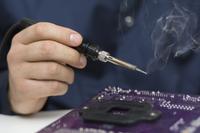 Smoke may be released from the flux, this is normal
 5. Cooling and Inspection
After removing the soldering iron, allow the joint to cool without any movement. This prevents the formation of cold solders, which are weak and make an unreliable connection. Once the solder has cooled and solidified, inspect the joint for clarity, full coverage, and the absence of solder bridges or drips. A properly soldered joint is shiny, smooth and free of irregularities.
Stable Hand, Strong Connection: Techniques for Precision Soldering
Soldering is like learning to ride a bike: the more you practice, the better you become. In the coming pieces we'll talk about how to improve your soldering technique. We'll give you tips on keeping your soldering tip clean, show you how to properly use soldering tin, and more. So grab your soldering iron and let's get started!
Clean soldering tip
A clean soldering tip is important for efficient soldering. Dirt and oxidation on the tip can hinder heat transfer, resulting in weak or cold solder joints. It is advisable to clean the tip after each use with a wet sponge or special cleaning curls. This prevents the build-up of old solder residue that can block heat conduction. A well-maintained soldering tip ensures faster and more even heat transfer, which is essential for a strong and durable connection.
Stable Hand, Strong Connection
Maintaining a steady hand while soldering is no less important than the quality of the soldering iron itself. It ensures that the soldering tip and solder are applied exactly where necessary. Practice keeping your hand as still as possible and use a 'third hand' or soldering stand for extra support if necessary. Consistently maintaining the correct angle between the soldering iron and the workpiece ensures even heat distribution and a clean solder joint.
Soldering Tin Correctly Dispense
Using the right amount of solder is a delicate balance. Too much tin can lead to sloppy, redundant connections that can cause a short circuit. Too little tin results in weak connections that can break. The key is to add just enough tin so that it completely covers the joint without overflow. This requires a steady hand and the ability to anticipate how the tin will flow once it hits the hot surfaces.
Control the Heat Element when Soldering
The correct temperature setting on your soldering iron is essential for making a good connection. Too hot and you risk damaging the components or the circuit board; not hot enough and the solder will not melt properly. Learn the optimal temperature settings for different types of solder and components. Use a temperature-controlled soldering iron to make precise adjustments. By carefully controlling the temperature you can maximize the quality and consistency of your soldering work.
Practice with Special Soldering Sets
Like any skill, soldering requires a lot of practice. It is useful to use special soldering sets designed to improve your skills. These sets contain fun projects for practicing your soldering technique. By practicing with these sets, you will master the finesse and dexterity needed for the most challenging soldering jobs.
Recognize and Fix Problems
In the next chapter we'll dive into the world of soldering problems and how to solve them. We discuss how to recognize, correct and prevent common errors such as cold soldering and solder bridges. We also discuss desoldering, a useful skill for correcting errors. This chapter is your guide to fine-tuning your soldering technique and troubleshooting any problems with confidence.
Cold Soldering: Recognizing and Repairing
Cold soldering can be recognized by a dull and grainy appearance, which indicates a bad connection. They are often caused by insufficient heat during the soldering process, which means that the solder does not flow properly. To fix this, gently reheat the joint with the soldering iron until the solder flows and forms a shiny surface. It is important to apply the right amount of heat without damaging the components, so monitor the temperature and heating time.
 Incorrect solder joints
 Solder Bridges: Prevention and Removal
Solder bridges occur when solder connects two or more contact points that should not be connected, which can lead to a short circuit. This usually happens due to excessive use of solder. To remove them, you can gently use soldering tape or a desoldering pump to remove the excess solder. A fine soldering tip and controlled application of solder help to prevent future bridge formation.
 A solder bridge
 Desoldering: The Art of Removal
Desoldering is sometimes necessary when you want to correct an error or replace a component. This requires a careful approach to avoid damaging the circuit board or components. Use a desoldering tape or desoldering pump to remove the old solder. It is important to use the correct temperature and allow the solder to completely melt before attempting to remove it. Patience and a steady hand are important to complete this process successfully.
Overheating: Damage reduction
When soldering, it is essential to avoid overheating to avoid damage to electronic components. Too much heat can damage delicate parts or weaken the circuit board. It is advisable to use a soldering iron with a controllable temperature and minimize the time the heat is applied to a component. Allow the part to cool between soldering steps to prevent heat build-up.
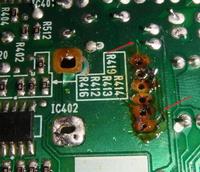 Contact points can even melt away
 Soldering with Precision: Fine Tuning
When working with small components or complex printed circuit boards, precision is of the utmost importance. For these tasks, use a fine-tipped soldering iron and consider using magnifying glasses such as special glasses or a microscope. This allows you to see your work area clearly and work with great accuracy. Maintaining a quiet environment and using a stable work surface help prevent unintended movement and vibration, which is crucial to achieving a perfect solder joint.
Soldering: The Final Connection
We have now reached the end of our soldering guide. We've gone through the important steps, from choosing your tools to troubleshooting common mistakes. Hopefully you have read how important it is to work accurately. Soldering is truly an art, and like any art, you get better the more you practice. So keep your soldering iron ready and your solder close by – the world of electronics awaits your new gadgets!


