DONOFF iot light dimmer
Placed onProject objectives
The objective of this project is to create an ecosystem that can work completely independently (i.e. without other hardware or software). Experience also shows that a physical switch is actually a “must” for these types of devices (just ask your partner). You can connect a physical switch to a DONOFF device (push or on/off switch) with which you can switch the lamp on and off. With a push switch you can even control the intensity of the lamp by holding it down longer.
Every DONOFF has a built-in web server that you can go to with a (tablet) computer, after which the control page of the DONOFF appears.

In this article I will describe the principles, electronics, firmware and construction of DONOFF devices.
Each DONOFF installation has one DONOFF device that performs the function of “master" has. All other DONOFFs are “slave”. All Slaves can be dimmed and switched on or off from the Master's web page.
Slaves automatically register with the Master with their IP address and Name. If you connect a new Slave to the mains, it will automatically appear on the Master's web page. If you disconnect a Slave from the mains, it will disappear from the Master web page after a while.

Below is what the function of the different items on the web page is:

With the slider you can set the brightness of the lamp. Clicking the Dimmer button turns the lamp on or off (the brightness is not adjusted when switched off). When switched on, the lamp switches on with the last set brightness.
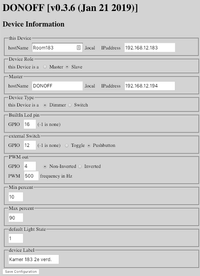
Every DONOFF has a web page where the various properties of the device can be set. Clicking on the “settings” icon will take you to this page:


