DONOFF iot light dimmer
Placed onDONOFF first boot
When you start the DONOFF for the first time, it has no configuration file and no credentials for your WiFi network. It therefore starts its own WiFi Access Point (AP) and waits for you to connect your computer to this AP.Select the WiFi network with a name such as "DONOFF 12:A3:45:6D:8F:F1". (the weird numbers are the unique MAC address of this ESP8266).

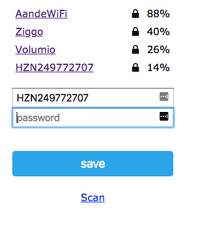
If you select this WiFi AP, you will get a WiFi configuration page as shown in the picture on the right. Select your WiFi network, enter the password of this network and click [Save].
The DONOFF will now restart. Using a browser, go to "DONOFFnew.local". That is the default hostname if DONOFF cannot find a configuration file. Change this hostname to something else (otherwise you will have problems setting up new DONOFFs!) After which you will see the configuration page (see the Introduction). Fill out all fields. If this is your first or only DONOFF, make it a Slave. When you have filled in all fields, click on [Save configuration]. The DONOFF will reboot and after a while you will see the control page of the DONOFF!
The DONOFF will now restart. Using a browser, go to "DONOFFnew.local". That is the default hostname if DONOFF cannot find a configuration file. Change this hostname to something else (otherwise you will have problems setting up new DONOFFs!) After which you will see the configuration page (see the Introduction). Fill out all fields. If this is your first or only DONOFF, make it a Slave. When you have filled in all fields, click on [Save configuration]. The DONOFF will reboot and after a while you will see the control page of the DONOFF!


