The LCD display module
Placed onDive with us into the fascinating world of LCD character displays, where we take a closer look at the timeless classics of the 1602 and 2004 screens, among others. These powerful and versatile displays have won the hearts of hobbyists and professionals alike in countless projects ranging from DIY weather stations to advanced industrial applications. In this blog, we unravel the secrets behind these two popular modules as we explore their capabilities and charms so you can make the perfect choice for the next masterpiece.

The emergence and popularity of LCD character display modules
The history of this LCD display module began in the 1980s when Hitachi introduced the HD44780 controller, which is now considered an industry standard. This groundbreaking controller made it easier for developers to use LCD modules in their projects, as it simplified communication between the display and the microcontroller. This allowed makers to focus more on the functionality of their projects rather than the complexity of the display technology.
Over the years, character LCD displays have evolved and adapted to the needs of the market. The 1602 and 2004 LCD modules are great examples of this. The 1602, a 16x2, 16-character, 2-line display, quickly became popular among hobbyists and professionals for its compact size and versatility. It enabled users to display simple and clear information on screen and provided a cost-effective solution for various applications.
Later the 2004 module was released, a 20x4 display with 20 characters and 4 lines, allowing users to display more information without the need for multiple screens. This module quickly became a favorite among developers who wanted to display more data in their projects, such as in advanced weather stations, automated systems and industrial applications. The popularity of character LCD modules, such as the 1602 and 2004, continues to this day due to their simplicity, reliability and ease of use in a wide variety of projects.
- In stock Opencircuit LCD module 128 x 64 blue € 12,-
- In stock Opencircuit 20x4 Characters lcd module blue € 5,75
- In stock DFRobot Gravity: I2C LCD1602 Arduino LCD Display Module (Gray) € 12,25
- In stock Opencircuit 16x2 Characters lcd module blue 5V € 1,90
- In stock Opencircuit 16x2 Characters lcd module blue 3.3V € 5,65
- DFRobot LCD Keypad Shield V2.0 for Arduino € 16,-
- DFRobot Gravity: 1602 LCD Keypad Shield For Arduino € 12,25
- SparkFun 20x4 SerLCD - RGB Backlight (Qwiic) € 52,50
- SparkFun 16x2 SerLCD - RGB Backlight (Qwiic) € 39,75
- Adafruit Standard LCD 16x2 + extras € 12,25
- DFRobot Gravity: I2C LCD1602 Arduino LCD Display Module (Blue) € 12,25
- DFRobot Gravity: I2C 16x2 Arduino LCD with RGB Font Display (Black) € 14,75
- DFRobot Gravity: I2C LCD1602 Arduino LCD Display Module (Green) € 12,25
How character LCD displays come to life: A look at the technology behind it
The operation of an LCD display, such as the 1602 and 2004 modules, is based on the use of liquid crystals that respond to electrical signals to display images and text. The heart of the display is the HD44780 controller, which acts as an interface between the microcontroller and the LCD panel. This controller translates the instructions received from the microcontroller into the correct voltages required to activate the liquid crystals and thus display the desired character.
The liquid crystals are sandwiched between two layers of glass, one of which has a matrix of electrodes to supply the voltage. When voltage is applied to a particular electrode, the liquid crystals change orientation, polarizing the light in a specific way. This causes the backlight to be blocked or passed through the glass, making the character visible on the screen.
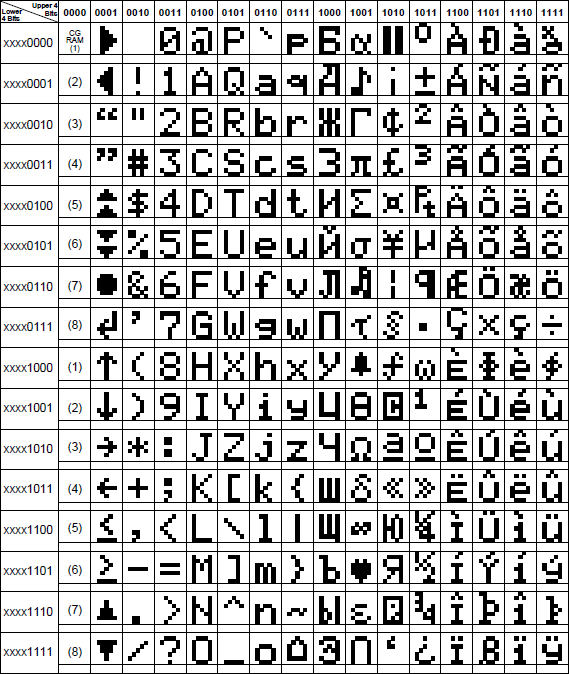
The LCD modules have a preset set of characters stored in their built-in ROM (see image below), which means they can display a limited set of predefined symbols and letters. To display text and graphics on the screen, the data is sent from the microcontroller to the HD44780 controller, which then positions the liquid crystals to form the desired character or pattern.
 HD44780 character set
 Add own characters
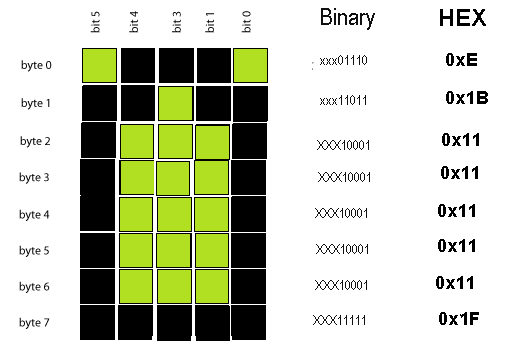
In the memory of the LCD display 8 characters can be added with 5x8 pixels. These must be written to the display as an 8-byte array. This is also very easy to do with the LiquidCrystal library.
 Custom characters LCD display
 The connection
 1602 LCD Pinout
 4 bit and 8 bit mode
The LCD can be controlled in 2 modes; 4 bit and 8 bit. This refers to the number of lines over which the data is written to the display. Data written to the display is always 8 bits long, so when the LCD is addressed over 4 bits, the data must be sent in 2 times. The advantage of this is that only 6 I/O pins need to be connected in total instead of the 10 pins in 8 bit mode. When reading from the display, R/W must also be connected to an I/O pin, but in this example it is connected to ground (always write).
Liquid Crystal Library
Since it can be difficult to access the correct registers, the LCD also requires a library available for the Arduino . This library comes standard with the Arduino software, so there is no need to download any additional files. As can be seen in the example, initialization with this library is very simple. To write text, only the number of characters on the screen (for example 16 x 2) and the desired message need to be set.
I2C interface module
With the I2C interface module even more pins are saved. This module only needs 2 data lines to drive the LCD display. Make sure that the baud rate is set to 115200!LiquidCrystal Library I2C
There is a modified version of the LiquidCrystal library available to address the display over I2C. The zip must then be unpacked into the Arduino library folder ( %HOMEPATH%\Documents\ Arduino \libraries ) to use it. As can be seen in the code example below, the LCD display can still be controlled in the same way. The I2C module also has a built-in potentiometer for the contrast of the characters.
A timeless technology: The lasting impact of the 1602 and 2004 LCD modules
In this blog, we've explored the exciting world of character LCD modules, with a special focus on the iconic 1602 and 2004 displays. We've covered the history, evolution, and operation of these modules, watching them become popular choices for hobbyists and professionals alike. These versatile and reliable displays continue to be an essential part of many projects and, despite the emergence of newer technologies, will retain their relevance due to their simplicity, ease of use and cost-effectiveness.


