Arduino IR Receiver
Placed onDo you happen to have a few unused buttons on your remote control and do you want to use them for home automation? The Arduino nano is ideal for this. With these simple steps you will have a working IR receiver within fifteen minutes!
Arduino IR Receiver
Opencircuit Arduino Nano R3 - clone - with headers In stock € 8,20 Adafruit IR Break Beam Sensors with Premium Wire Header Ends - 3mm LEDs Delivered in 10 to 30 days € 3,75 Opencircuit 5mm Led warm wit - 50 stuks In stock € 2,60 Opencircuit Breadboard 830 points - white Delivered in 14 to 30 days € 1,20 Opencircuit 270Ω Metal film resitor 1/4W - 10 pieces In stock € 2,50 Opencircuit Male-Male jumper set 65 stuks Delivered in 14 to 30 days € 1,65 Total € 19,90connecting the components
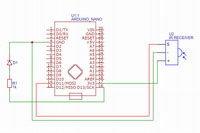
To make the receiver you connect your ir-led to your Arduino , respectively pin 1 to D11, 2 to ground, 3 to 3.3v.
You connect the LED with the positive negative side to ground. We connect the positive side to a resistor. This is very important because otherwise too much current would flow through our LED. The resistance value may differ depending on the type of LED. You can calculate the resistance value with the LED characteristics.
calculating the resistance
(see photo below)
suppose we want to set our led to 10mA, then the voltage across the led should be 1.7v. If the total source voltage is 3.3v, then there must be a voltage of 1.6v across the resistor. Since the currents in a series circuit are the same through each component, 10mA will also flow through the resistor. Next, we take Omh's law to calculate the resistance of the resistor. So: U= I*R => R=U/I. R=1.6/0.01=160R. In this example, our resistor has a value of 160ohm.
programming
Before you start you must first install the library of the ir receiver. put the library in the folder: C:\--\Documents\ Arduino \libraries
Then upload the code decoder to display the codes from the receiver in the serial monitor. If you now point your remote control at the receiver and press a button, you will see the serial monitor codes appear.
link library:
https://drive.google.com/open?id=1iBWlBIPn2rXS_1roQhdSqZDVmaq1aZNw
decoder

if you pressed 2 buttons then open the code below. Change the text "-here-" with the 2 codes that are in the serial monitor. Please note that these are 2 different codes (one to turn the led on and one to turn them off).
led
after uploading the code the led would turn on and off when the buttons were pressed.
have fun with it!
Ward


