Integration ESP8266 / DSRM logger data with Home-Assistant
Placed onPlatform: MQTT
The easiest way to share data on an ESP8266 with Home-Assistant (HA) is through an MQTT broker. An MQTT broker is a service that runs on HA's HassIO installation by default. MQTT stands for Message Queuing Telemetry Transport system and it consists of clients that communicate with a server (the 'broker'). A client can be both a subscriber (someone who requests data) and a publisher (someone who supplies data). Information is grouped into 'topics'. If a publisher has new information, he sends it to the broker. The broker then ensures that every client that has a subscription to this specific topic receives this new information.The topics are organized hierarchically, which means that a topic, for example “ESP8266/Abc/Temperature”, consists of “ESP8266, under which is “Abc” and under which is “Temperature”. For example, the “ESP8266/Abc/” hierarchy can also contain “Air pressure” (ESP8266/Abc/Air pressure). If a client has a subscription to only “ESP8266” then he will also receive all messages that fall under it!
If a new client registers with an interest in a certain topic, this client will immediately receive the latest information about this topic. The subscriber therefore does not have to wait for an update for this topic. He always gets, instantly, the latest known information.
If the MQTT broker (mosquitto) is not installed on your Raspberry Pi , you can still do so:
To then automatically start the mosquitto server when starting your RPi, enter:
pi@raspberry:~ $ sudo apt update
pi@raspberry:~ $ sudo apt install -y mosquitto mosquitto-clients
pi@raspberry:~ $ sudo systemctl enable mosquitto.serviceSo much for the theory.
Integration
The integration between the ESP8266 and Home-Assistant via MQTT schematically looks like this: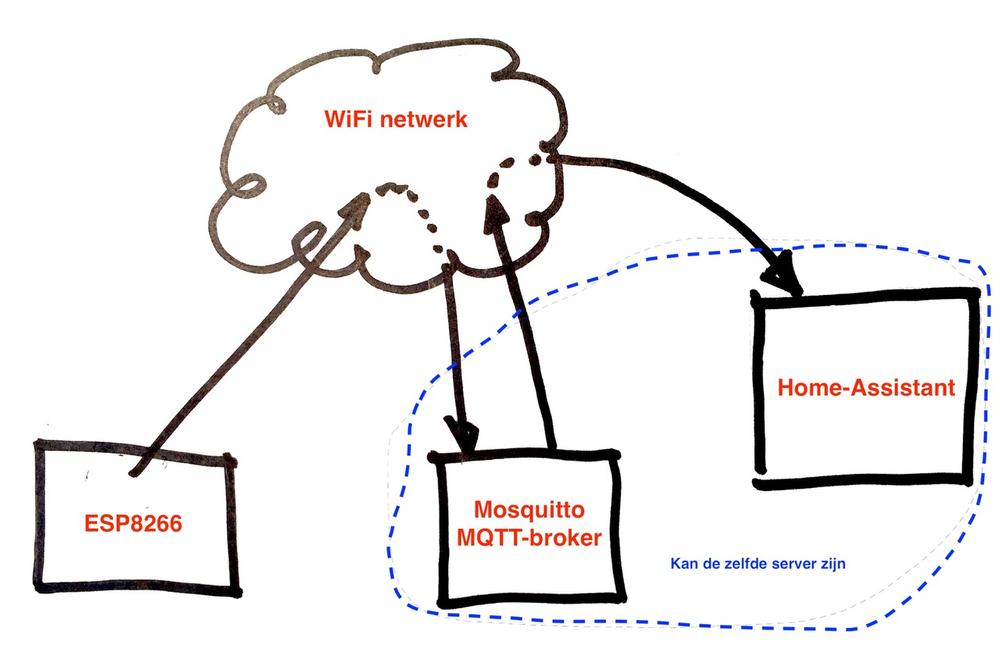 ESP/MQTT/HA
 To be able to connect to an MQTT broker with the ESP8266, the library pubsubclient by Nick O'Leary
be installed in the Arduino IDE (https://github.com/knolleary/pubsubclient).
As an example we use a project where the ESP8266 reads a BMP085 (GY-68) sensor and sends the data to the MQTT broker.I have the circuit as shown in the picture below 1of! prototype plate (left) soldered and the Sketch on the 1or!-ESP12 sign (right) flashed.
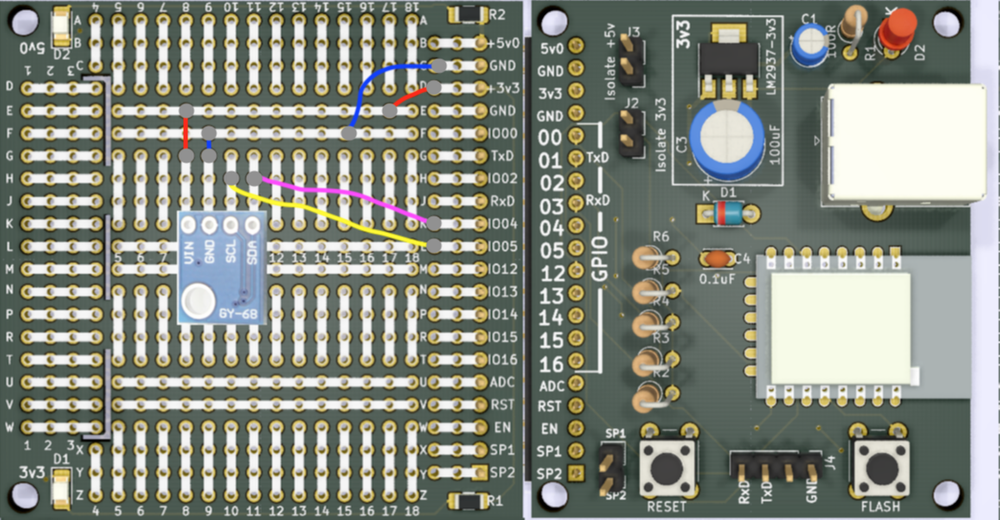 1of!-ESP12 Proto GY68
 After installing the aforementioned library, there are under “File->Examples” / ”File->Examples” placed a number of example programs at “PubSubClient”. For this introduction we assume the program “mqtt-esp8266” and all line numbers refer to the positions in the original Sketch!
After line 27, the following two lines must be added:
Lines 31, 32 and 33 need to be modified for your installation.
After line 36 the following code should be added:
If a message arrives on the topic “inTopic”, the function becomes callback()called where, in the example program, in lines 73 through 80, depending on the content of the message, the BUILTIN_LED is turned on or off. I will not use this functionality and these topics in this post.
Because we mainly want to send data from the ESP8266 to HA for this post, we will create an extra function that looks like this:
After line 27, the following two lines must be added:
#includeOf course you must first download the library “Adafruit_BMP085” (https://github.com/adafruit/Adafruit-BMP085-Library) and install it in the Arduino IDE!
#include
Lines 31, 32 and 33 need to be modified for your installation.
31 const char* ssid = "........";Bee ssid you must enter the name of your WiFi network and at password the password of your WiFi network. Bee mqtt_server you have to enter the IP address of your HA server (which at HA is often the same IP address as your HA server).
32 const char* password = "........";
33 const char* mqtt_server = "broker.mqtt-dashboard.com";
After line 36 the following code should be added:
// Connect VCC of the BMP085 sensor to 3.3V (NOT 5.0V!)and in setup() after line 113 add this:
//Connect GND to Ground
// Connect SCL to i2c clock - on GPIO05
// Connect SDA to i2c data - on GPIO04
Adafruit_BMP085 bmp;
if (!bmp.begin()) >The Sketch has one subscription on the subject "inTopic” and publishes on the topic “outTopic”.
If a message arrives on the topic “inTopic”, the function becomes callback()called where, in the example program, in lines 73 through 80, depending on the content of the message, the BUILTIN_LED is turned on or off. I will not use this functionality and these topics in this post.
Because we mainly want to send data from the ESP8266 to HA for this post, we will create an extra function that looks like this:
This function reads the BMP085 and prints the found values on the Serial Monitor and publishes this data. The main topic is “ESP8266”. The subtopic "thisDevID” must be modified in a production environment in “something” that can uniquely identify this 'sensor module' (in case you have more than one) and below that an indication that indicates the type of data (Temperature, Barometric Pressure and Altitude). The actual values are sent as a json string.
Next, we change the loop() function as follows:
Next, we change the loop() function as follows:
void loop() > // loop()If you have a username and password have set up, you must use this information when connecting to the broker. After line 33, add the following two lines:
char* mqttName = "..."; // name for MQTT loginLine 92 says:
char* mqttPasswd = "..."; // .. and his password
92 if (client.connect(clientId.c_str())) {
you have to adjust it as follows: 92 if (client.connect(clientId.c_str(), mqttName, mqttPasswd)) {
If you now upload the program to the ESP8266 you will see in the Serial Monitor: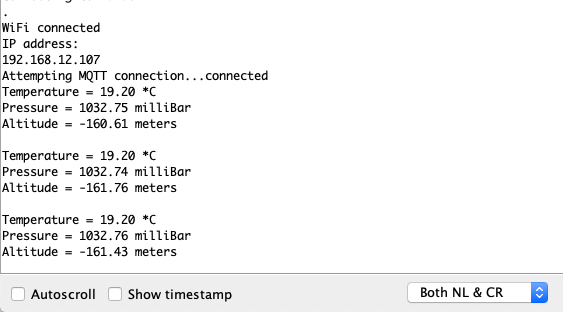 ESP8266 MQTT Output
 Now log in to your HA server and enter:
You will then see the following information appear:
mosquitto_sub -hThe MQTT installation on the Raspberry Pi is called 'mosquitto'. With the above command we start a client that connects to the MQTT server on the specified IP address (which in many cases will be the same IP address as the IP address of the HA server) with the username and password you entered for have set up the MQTT server. The “-t” option indicates that we are only interested in topics that begin with “ESP8266/”.-u -P mqttPasswd> -v -t ESP8266/#
You will then see the following information appear:
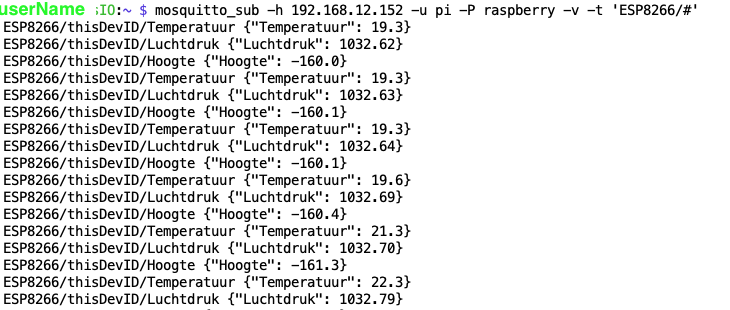 mosquitto_sub
 Now that we know for sure that the messages from the ESP8266 end up with the MQTT broker, we can try to have HA extract these values from MQTT and present them on its front-end.
HA needs to know who the MQTT broker is to contact. That's why we're taking it configuration.yaml file this data at:
HA needs to know who the MQTT broker is to contact. That's why we're taking it configuration.yaml file this data at:
mqtt:I have all my group configurations in the folder ./groups and all my sensor configuration yaml files in the sub-folder ./sensors. I have it for that configuration.yaml also included these rules:
broker:
postage: 1883
client_id: HassIO
keep alive: 60
username:
password:
group: !include_dir_merge_named groups/In the map ~/.homeassistant/sensors/ let's create a new file called esp8266.yaml which has this content:
sensor: !include_dir_merge_list sensors/
In this we say that we want to use the platform mqtt, that within the configurations the items “ESP8266_Temperature”, “ESP8266_Air pressure" and "ESP8266_Height” occur and the data from the publication “ESP8266/thisDevID/xxx” should be extracted from the json string.
Then we add in the folder ~/.homeassistant/groups the file esp8266.yaml with the following content:
Then we add in the folder ~/.homeassistant/groups the file esp8266.yaml with the following content:
After restarting Home-Assistant we can admire the data in the Front-end.
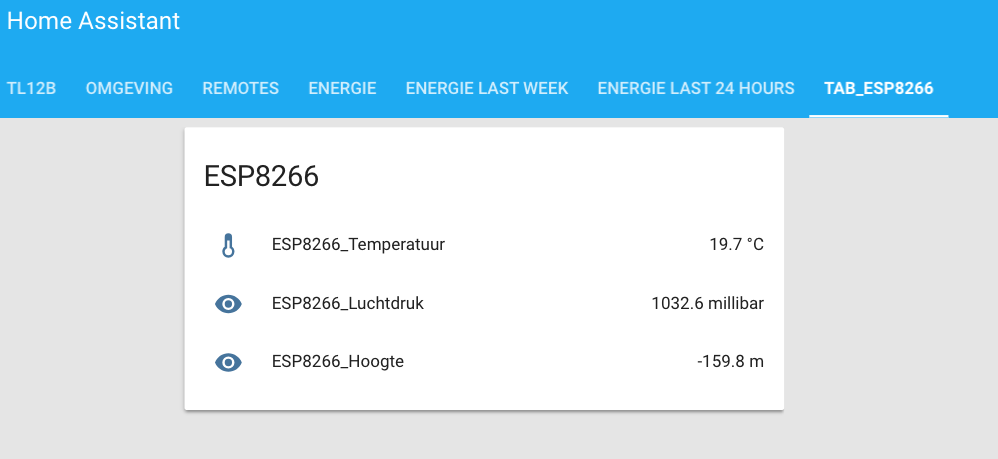 HA Front-end
 Platform: restAPI
Home-Assistant can also retrieve data from other systems (for example from the DSMR logger) via a restAPI.In the map ~/.homeassistant/sensors For example, you need to enter the following data:
However, if the restAPI returns multiple data with one request, this approach has the disadvantage that if you call the restAPI for each field, there is a lot of data.”goes over the line” and that the external system is also quite heavily loaded. I opted for a different approach for reading out the Smart Meter reader (DSMR logger).
Platform: File
To read out the DSMR logger, I chose to have Home-Assistant extract the data from a file. That file is on the same computer on which Home-Assistant runs, which minimizes the overhead.It works like this:
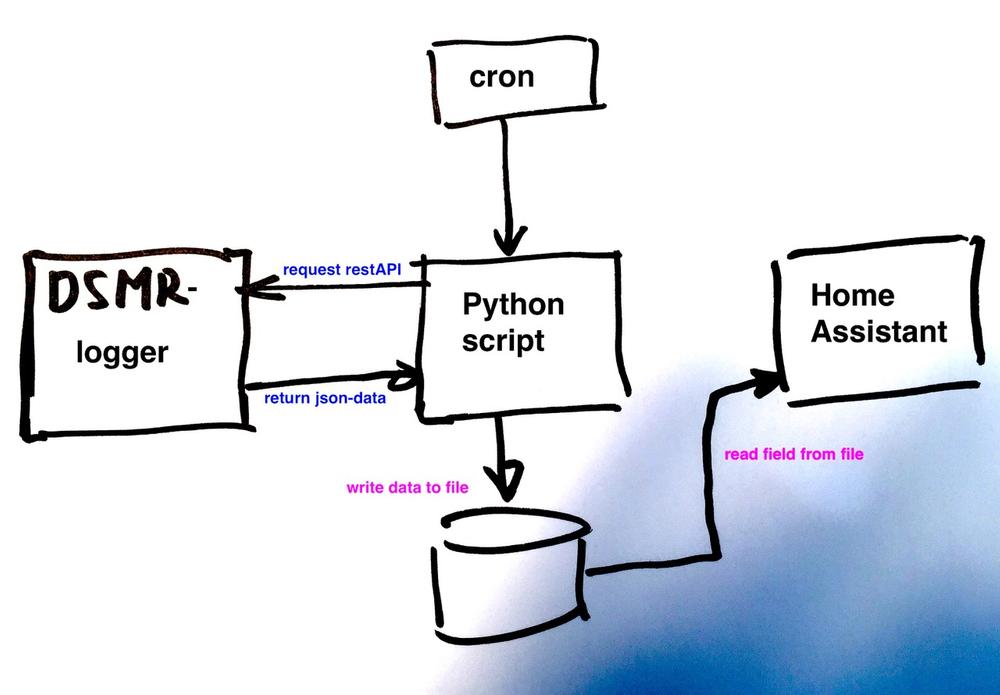 DSMR - Home Assistant
 Cron is the Unix/Linux daemon that starts jobs based on time. In our case he has to start the python script “DSMR_Actual.py” every minute. With the command 'crontab -e' (as user root!!) you can add the following line in crontab:
# For more information see the manual pages of crontab(5) and cron(8)The DSMR_Actual.py program has the following contents:
#
@reboot /home/homeassistant/.homeassistant/scripts/DSMR_Actual.py
#
# m h dom mon dow command
# every minute
* * * * * /home/homeassistant/.homeassistant/scripts/DSMR_Actual.py
#
In line 5 'url' gets the value of the rest API of the DSMR logger that is used to request the current data. Line 6 converts this into a request to the DSMR logger and line 9 stops the response from
the DSMR logger into the variable 'r' which is then decoded in line 10 and put into the variable 'response'. Finally, json.dump() writes the contents of response to the file '/tmp/DSMR-Actual.json'.
The content of the '/tmp/DSMR-Actual.json' file looks like this:
the DSMR logger into the variable 'r' which is then decoded in line 10 and put into the variable 'response'. Finally, json.dump() writes the contents of response to the file '/tmp/DSMR-Actual.json'.
The content of the '/tmp/DSMR-Actual.json' file looks like this:
To keep things a bit clear, I have placed all programs and scripts that I use for Home-Assistant (HA) in the folder ~/.homeassistant/scripts/ stopped.
Now we just have to make it clear to HA that they want to extract the data from the DSMR logger from the file /tmp/DSMR-Actual.json must get.
I have all the sensors in the map ~/homeassistant/sensors stopped. In the configuration.yaml file I have the following reference:
parsed and included.
One of the sensor configuration files is DSMT_Actueel.yaml. This has the following content:
Now we just have to make it clear to HA that they want to extract the data from the DSMR logger from the file /tmp/DSMR-Actual.json must get.
I have all the sensors in the map ~/homeassistant/sensors stopped. In the configuration.yaml file I have the following reference:
group: !include_dir_merge_named groups/These rules ensure that all .yaml files that are in the folder groups/ or sensors/ be saved as a configuration file of the HA installation
sensor: !include_dir_merge_list sensors/
parsed and included.
One of the sensor configuration files is DSMT_Actueel.yaml. This has the following content:
To actually get this data on the HA front-end, the folder ~/.homeassistant/groups/ a file DSMR logger.yaml are created with the following content:
With the restart of Home-Assistant we can admire the data from the Smart Meter reader:
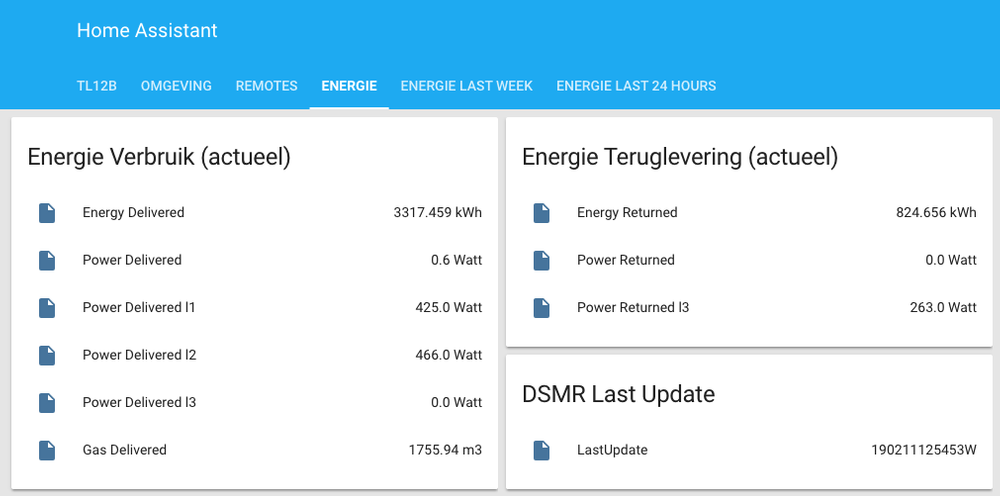 Home Assistant Energy Actual
 Opencircuit ESP8266 ESP-01S WIFI Module The ESP8266 WiFi module was presented at its introduction as a TTL "Serial to Internet" module. Handy to connect Arduino boards to the internet. It soon turned out that this ESP-01S module and its number of GPIO pins, outwardly carried, bigger brothers (ESP-7, ESP-12, NodeMCU etc. In stock € 3,60


