


I2C rotary encoder
Placed onI²C Rotary Encoder
I will cover two topics in this article.
The first is about Rotary Encoders and (briefly) how they work. The second is about the Inter-Integrated Circuit protocol (I²C) developed by Philips.
rotary encoders
A Rotary Encoder is a device that (physically) resembles a potentiometer, but does not vary the resistance between two/three connectors but instead gives pulses when the shaft is turned. Another difference with the potentiometer is that you can rotate the shaft 360° (there is in fact no limit to how many degrees you can rotate the shaft).
Most Rotary Encoders have a push switch that activates when you press the shaft. And there are Rotary Encoders that have an internal three-color LED (so-called RGB Rotary Encoder) with which you can give feedback to a user with a palette of colors.
 RGB Rotary Encoder
 The Rotary Encoder generates pulses when the shaft is turned. Most Rotary Encoders generate 24 pulses with every 360° rotation, but there are also Rotary Encoders that deliver more or fewer pulses per revolution. In your program you can count these pulses and react to them (for example: increase or decrease the output voltage of a power supply or go through a menu list).
You may ask: " why use a Rotary Encoder and not just a potentiometer? ". Of course there is no " this is better than that " answer to this. It depends on the project. If you're building an analog hi-fi amp, the potentiometer is probably the better choice. If you have a project with a microprocessor then the Rotary Encoder gives you many options to create a nice user interface (with maybe a fine/coarse change depending on the short or long press on the axis and a colored feedback to show which mode active).
Below is an example sketch to “read” a Rotary Encoder. For this program to work properly and reliably, you need hardware bounce control (RC network) on pins A and B of the encoder:
Demo Sketch Rotary Encoder
Unfortunately, using a Rotary Encoder in a project also has a disadvantage: you need a lot of GPIO pins!
One RGB Rotary Encoder needs two GPIO pins for the Encoder itself (plus GND), then you need one GPIO pin for the push switch and three GPIO pins for the RGB LED. That's a total of six GPIO pins! On an ESP8266, for example, you then only have three GPIO pins left to control the rest of your project! On an Arduino UNO you have more GPIO pins so one Rotary Encoder won't be a problem. But what if you want to connect two, three or even more Rotary Encoders. That is not possible on an ESP8266, but on an Arduino UNO you will soon run out of GPIO pins!
Fortunately, there is a solution!
The Inter-Integrated Circuit bus (I²C)
This is called a (data) "bus" because you can connect many devices to it. The "bus" consists of two lines. A clock line (SCL) and a data line (SDA). There is always (at least) one'master'-device and all other devices are 'slave' devices. Each device has a unique address to distinguish itself from each other. I won't go into the depths of the I²C protocol, but normally the master will claim control of the bus and send a request to a slave with a specific address. The slave, in turn, will take action on the request, either by performing a specific action in the slave itself, sending data back to the master, or simply sending an acknowledgment back to the master letting it know that he has received the request. Here you can read more about the I²C protocol.
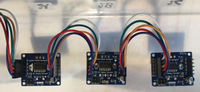
The I²C Rotary Encoder
Wouldn't it be nice to be able to connect a Rotary Encoder using only the two wires of the I²C bus!?
And that's what this post is really about: a Rotary Encoder that you connect via the I²C bus and control using the I²C protocol.
I designed the firmware and a small circuit board with an ATtiny841 microprocessor. The ATtiny841 has built-in wirehardware (the layer below I²C) making it extremely suitable as an I²C Slave for this design.
 I2C Rotary Encoder v2.2 bottom view
 The firmware ensures that the ATtiny841 behaves, on the one hand, as a 'normal' I²C Slave and, on the other hand, provides the interface with an RGB Rotary Encoder. To easily control the I²C RotaryEncoder I have a matching and easy to use one Arduino / ESP8266 library written.
With this setup it is possible to connect as many (literally!) I²C RotaryEncoders to your microprocessor as you want and still only need to use two GPIO pins. You can even connect other I²C devices (displays, sensors, etc.) to the same two GPIO pins, leaving many GPIO pins free for other purposes.
 I2C BUS
 If you want, you can use the Interrupt pin of the I²C RotaryEncoder to make your program "Interrupt-driven".
The Interrupt pin generates an Interrupt with every change in the position of the rotary shaft or push button. All I²C RotaryEncoders share the same interrupt line.
How can you use the I²C RotaryEncoder in your project?
The code below is an example sketch to communicate with the I²C RotaryEncoder (using the Interrupt pin):