


Turn on the LED with bluetooth and create your own app.
Placed onHello my name is Daphne. In this I try to explain how to turn on an LED light with your phone. This is the first time I write an article about it if you have tips or questions you can always ask them. Once you have mastered this, you can make a lot of fun things with bluetooth.
What do you need?
Products list
Arduino Uno R3 - clone In stock € 11,50 HC-06 Bluetooth module met adapter In stock I used this one but you can also use the HC-05 € 8,50 Male-Female 10 cm band cable 40 pieces In stock € 2,35 Resistor set 1% 600 pcs 30 values Out of stock € 5,10 Set of 80 assorted leds In stock € 9,95 USB 2.0 cable type B 100cm blue In stock € 3,25 Total € 40,65Connect
We start by connecting the LED and the bluetooth module to the Arduino board. I don't use a breadboard myself, but you can use them.
You solder a resistor to the short leg of the LED light and put it in GND under the digital PWM.
You put the other leg of your LED in 13.
Grab your bluetooth module on the back are different letters, so you have to connect them.
RXD-TX
TXD-RX
GND - GND
VCC-5V
state and AND we will not use now
 connection diagram
 Computer programming
The programming is pretty simple and I've tried to explain what happens with each line. Surely there could be an easier way. You can copy this in your Arduino program. If you upload this on your Arduino you may get an error, please unplug the TX and RX cable and try again.
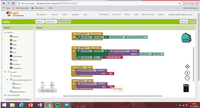
Create app.
I am using MIT app inventor. You only need a gmail address to log in.
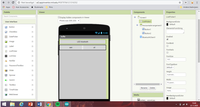
-Drag Listpicker from the left column into the phone shown. On the right side you can give it a different name or give it a nice color. At width you want to set it to fill parent. With this you can connect with bluetooth in a bit
-Under layout, drag a horizontal arrangement into it.
-Drag 2 buttons in the horizontal arrangement. You want these next to each other and both also fill parent. You can give this name off and on.
-At Connectivity on the right you can drag a bluetooth client into it, it should be under your phone.
In the top right corner you will see blocks that you want to click on.
Under list picker 1, you now want to drag Before picking to the center and drag after picking to the center.
Under before picking you want a puzzle piece with elements, this is also under the heading list picker
to this you want a puzzle piece with addresses and names, this is under the bluetooth client button
Under after picking you want a puzzle piece with selection (this is also under list pickers). You want a puzzle piece with connect address to this (this is under bluetooth client). This is where you want selection (under listpickers).
At the first selection puzzle piece you want one with text (under listpickers) and at this you want an empty text box (you can find this in the text box on the left) with connected in it or as I have it. HE DOES IT.
Below you want 2 puzzle pieces with button 1 and button 2
On button 1 you do a send text (under bluetooth). add another empty text box with 1 in it
With button 2 you do the same, only then in the text box the number 0
When you have done all this you can download the app on your phone. This one is called MIT A12 Companion. With this app you can scan a QR code. You can find the QR code in the web browser in which you just created the app. At the top is build here you can press QR code. Now you download the app. Connect your phone with the bluetooth module not only in your settings but also in the app and then it will have to do it.
I hope it's all a bit clear. Good luck building. If you have any further questions or tips and tricks, you can always leave a message.